Bunny Cupcakes for Easter (Bunny Butt Cupcakes)
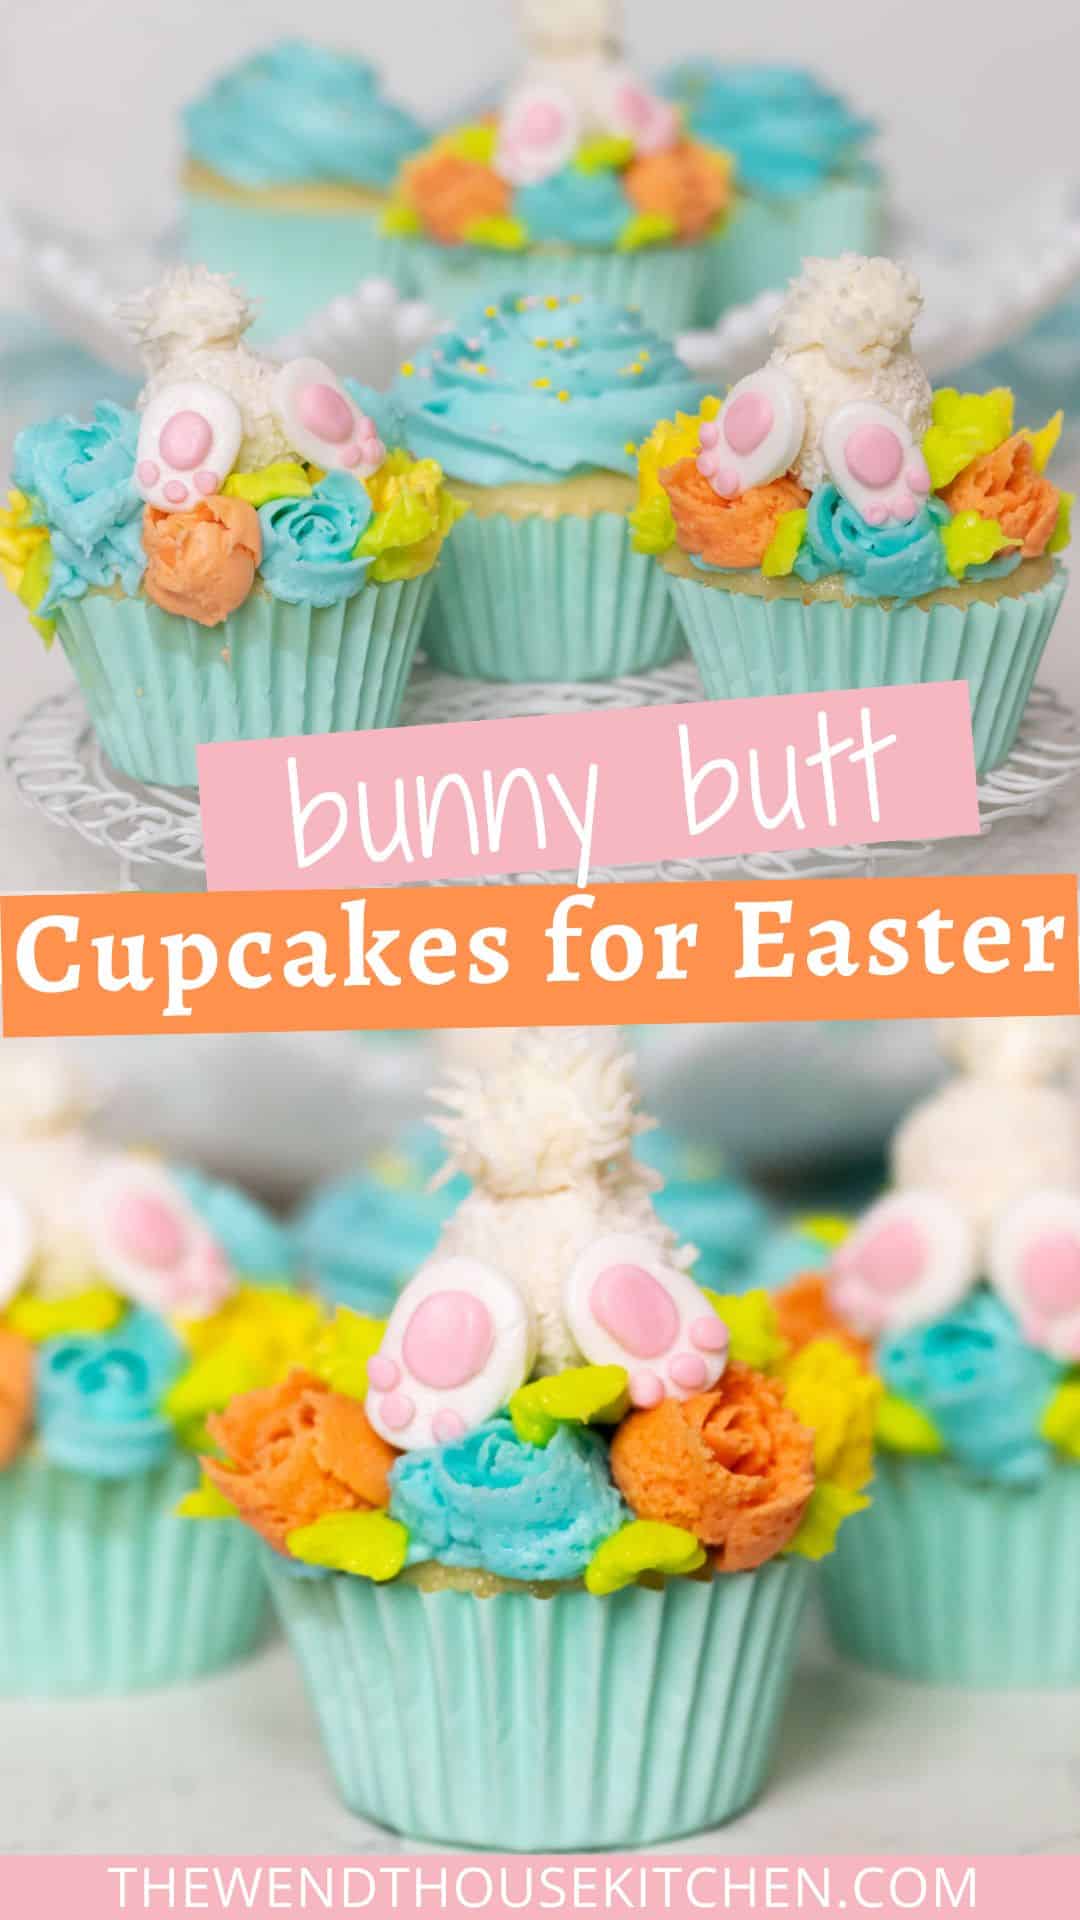
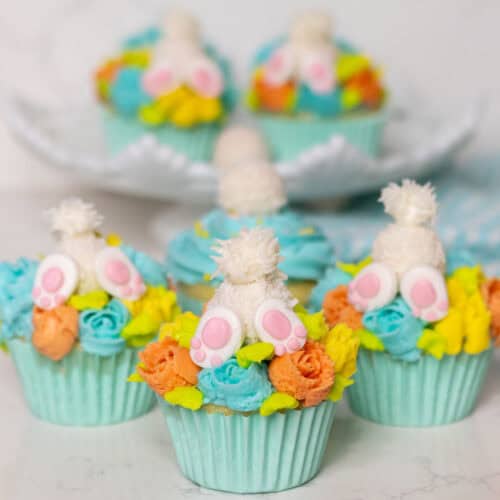
These adorable bunny cupcakes for Easter are a cute little bunny butt made from Raffaello candies, mini marshmallows for the tail and fondant bunny feet. The bunny butt rests on buttercream flowers created with Russian piping tips.
 | thewendthousekitchen.com")
 | thewendthousekitchen.com")
Why You Will Love These Bunny Butt Cupcakes
- They are adorable!
- The bunny butt is made from a Raffaello candy. SO good!
- They are a perfect Easter dessert that everyone will gush over.
- They are easy to make and you can decorate the cupcakes any way you like.
Are these not the CUTEST bunny cupcakes for Easter you have ever seen? Kids love these sweet little bunny butt cupcakes and adults can’t resist them either.
If you have never had Raffaello candies, you are in for a real treat. Think “Ferrer Rocher”, but in coconut form. The center of the candy is a whole almond that is surrounded by a creamy filling encased in a crispy wafer shell. Then it’s coated in coconut flakes.
When I was trying to think of how I wanted to make these little bunny butts I threw around a couple of ideas like a marshmallow, donut holes and white chocolate candy truffles. All of those could be used, but the coconut on the Raffaello candies look like a fuzzy bunny butt. They are perfect!
These cupcakes are definitely based off of my easy buttercream floral cupcakes that I made with Russian piping tips. SO easy to make a beautiful flower. You don’t have to make the flowers if you don’t want to. The bunny butts will still be cute on a regular frosted cupcake.
Ingredients
 | thewendthousekitchen.com")
- 12 baked cupcakes, any flavor (or 24 cupcakes. I did a buttercream swirl on the additional 12.)
- buttercream frosting (I used three different colors for the flowers plus green for the leaves. I left some white to use to stick the bunny butts on. I also decorated an additional 12 cupcakes with just a swirl of frosting.)
- Raffaello candies
- white fondant
- pink fondant
- mini marshmallows
- red or pink gel food color (For tinting the white fondant pink. You will also need additional gel colors for tinting your buttercream the colors of your choice.)
- vegetable shortening for greasing your mat
See recipe card for quantities.
Instructions
For the Bunny Feet
 | thewendthousekitchen.com")
")
 | thewendthousekitchen.com")
 | thewendthousekitchen.com")
Step 1: Grease a Silpat or fondant mat with vegetable shortening.
Step 2: Roll out white fondant to about 1/4 inch thick.
Step 3: Grease the top of the white fondant and the the bottom of the small teardrop cutter. Using the teardrop cutter, cut out 24 teardrop shapes.
 | thewendthousekitchen.com")
 | thewendthousekitchen.com")
 | thewendthousekitchen.com")
 | thewendthousekitchen.com")
Step 4: Using the wide end of the teardrop cutter, cut the pointy end of the teardrop off of each fondant shape to make a bunny foot.
 | thewendthousekitchen.com")
 | thewendthousekitchen.com")
Step 5: Grease the Silpat or fondant mat with more shortening.
Step 6: Roll out the fondant to about 1/4 inch thick.
 | thewendthousekitchen.com")
 | thewendthousekitchen.com")
 | thewendthousekitchen.com")
 | thewendthousekitchen.com")
Step 7: Grease the top of the pink fondant and the tip of a size 12 piping tip. Make 24 pink circles.
Step 8: Lightly press down on each circle to elongate it a little bit.
Step 9: Gently squeeze the sides of each circle to make a small oval for the paw prints.
 | thewendthousekitchen.com")
 | thewendthousekitchen.com")
Step 10: Roll out the pink fondant again. Grease the fondant and a size 5 piping tip. With the tip, make 72 circles. I made 12 at a time, letting them build up inside of the piping tip. I used the tip of a paint brush to push them out of the tip if they got stuck.
Now you have all the parts to make your bunny feet.
 | thewendthousekitche.com")
 | thewendthousekitche.com")
 | thewendthousekitche.com")
 | thewendthousekitche.com")
 | thewendthousekitche.com")
Step 11: Using a small paint brush, add a small amount of water to the middle of one of the white bunny paws.
Step 12: With a small spatula, move one of the larger pink bunny pads onto the middle of the bunny paw where you added the water. Repeat with all of the bunny paws.
 | thewendthousekitche.com")
 | thewendthousekitche.com")
 | thewendthousekitche.com")
 | thewendthousekitche.com")
Step 13: Using the end of the small paint brush, lighly press three small holes into the bottom of the bunny paw.
Step 14: Add a small amount of water to each hole with the paint brush.
Step 15: Using the small spatula, add a small circle to each hole and press down lightly with your finger until you have three small paw prints. Repeat with each bunny paw.
For the Buttercream Flowers
 | thewendthousekitchen.com")
 | thewendthousekitchen.com")
Step 1: Get your Russian piping tips and and piping bags together. Russian piping tips do not have numbers on them so I took a photo so you can see which ones I am using. I used 16-inch piping bags for these tips. I recommend using strong bags like these.
 | thewendthousekitchen.com")
 | thewendthousekitchen.com")
 | thewendthousekitchen.com")
 | thewendthousekitchen.com")
 | thewendthousekitchen.com")
Step 2: Drop the tip into the piping bag and push to the bottom of the bag.
Step 3: Using a pair of scissors, score a mark about halfway up the piping tip.
Step 4: Pull the tip out a little and cut on the line you made. Push the tip in so it fits snuggly into the bag.
 | thewendthousekitchen.com")
 | thewendthousekitchen.com")
 | thewendthousekitchen.com")
 | thewendthousekitchen.com")
Step 5: Fold the bag over your hand and fill with buttercream. Twist tightly and and secure with a piping bag tie if you have one. Repeat with other bags.
 | thewendthousekitchen.com")
 | thewendthousekitchen.com")
 | thewendthousekitchen.com")
 | thewendthousekitchen.com")
Step 6: Lightly frost a cupcake with an offset spatula. You want a small amount of frosting so that the flowers will stick.
Step 7: With one of the bags fitted with a Russian piping tip, hold the tip over the cupcake so it isn’t touching the cupcake and start squeezing the bag.
Step 8: Start squeezing the bag until the buttercream starts to reach the cupcake. Continue squeezing while pulling the bag up at the same time until you get the height of flower you want. Stop squeezing and pull the bag away.
(You may have to practice a little bit to get the feel and the motion of making the flower. You can scrape the buttercream off of the cupcake and start over if you need to.)
Step 9: Pipe buttercream flowers around the cupcake in different colors until you’re happy with the way your cupcake looks. Repeat with the rest of your cupcakes. Now you’re ready to add your bunny butts.
I actually made 24 cupcakes. I made 12 with bunny butts and 12 with just a buttercream swirl.
For the Bunny Butts
 | thewendthousekitchen.com")
 | thewendthousekitchen.com")
 | thewendthousekitchen.com")
 | thewendthousekitchen.com")
 | thewendthousekitchen.com")
Step 1: Prepare two 12-inch piping bags as before using couplers. You will have one bag with white buttercream for sticking on the bunny butt and making a fuzzy tail and one bag with green buttercream for leaves.
On the bag with the white buttercream, you’re going to start with tip #3. You will change to tip #233 when it’s time to make the fuzzy tail.
 | thewendthousekitchen.com")
 | thewendthousekitchen.com")
 | thewendthousekitchen.com")
Step 2: Using the bag with the white buttercream fitted with tip #3, pipe a large dot in the middle of your cupcake where you want your bunny butt to lay.
Step 3: Open up your Raffaello candy and place it onto the cupcake.
 | thewendthousekitchen.com")
 | thewendthousekitchen.com")
 | thewendthousekitchen.com")
 | thewendthousekitchen.com")
 | thewendthousekitchen.com")
Step 4: Take one of the bunny paws and add a dot of white buttercream onto the back of it.
Step 5: Lightly press the paw onto one side of the Rafaello candy. Repeat with the other paw.
Add the candies and the paws onto the rest of the cupcakes.
Step 6: Use your green buttercream and tip #352 to add leaves between the flowers and around the cupcakes.
 | thewendthousekitchen.com")
 | thewendthousekitchen.com")
 | thewendthousekitchen.com")
 | thewendthousekitchen.com")
Step 6: Cut 6 mini marshmallows in half with kitchen scissors.
Step 7: Add a dot of white buttercream onto the back of the marshmallow and stick on top of the Raffaello candy for a tail. Repeat for all 12 cupcakes.
Step 8: Change the tip on your white buttercream bag to tip #233.
Step 9: Hold the tip close to the mini marshmallow and start squeezing, building up the furry tail. As you’re squeezing, pull up a little. Stop squeezing and pull the tip away. Do that all around the marshmallow. Do each bunny tail.
Step 10: If you’re making an additional 12 cupcakes, decorate them with a 1M piping tip to make a buttercream swirl.
 | thewendthousekitchen.com")
Hint: I like to color all of my buttercream and bag it up before I do anything so I don’t have to worry about it later and I’m organized while decorating.
Variations
- Use different colors for the flowers and different types of Russian piping tips to change things up.
- I used my white almond sour cream cake for these cupcakes, but you can use any flavor cake with these little bunny butts. Carrot cake would be a great choice.
- Instead of buttercream flowers, you can use tip #233 and make green grass. That would also be adorable.
Equipment
- Silpat or fondant rolling mat
- small fondant rolling pin
- offset icing spatula
- small fondant tool spatula
- small teardrop fondant cutter
- small paint brush
- small bowl for water (for paint brush)
- kitchen scissors
- piping tips #’s 3, 5, 12, 1M (for buttercream swirl on additional 12 cupcakes), 233, 352
- 12-inch piping bags
- 18-inch piping bags
- piping bag ties
- 2 couplers
Storage
Storage for your cupcakes depends on the cupcake and buttercream recipes that you use for your bunny butts.
Top Tips
- Make sure your cupcakes are completely cooled before decorating.
- Use a medium consistency buttercream to pipe your buttercream flowers so they keep their shape.
- Take your time and have fun decorating!
Related
Check out my other post on making Easy Buttercream Floral Cupcakes with Russian piping tips.
Bunny Cupcakes for Easter (Bunny Butt Cupcakes)
- Silpat or fondant rolling mat
- small fondant rolling pin
- small offset icing spatula
- small fondant tool spatula
- small teardrop fondant cutter
- small paint brush
- small bowl for water (for paint brush)
- kitchen scissors
- piping tips #’s 3, 5, 12, 1M, 233, 352 (1M tip if you want to do additional 12 cupcakes with a swirl of buttercream.)
- 12-inch piping bags
- 18-inch piping bags
- 12 baked cupcakes, any flavor (I did an additional 12 with a buttercream swirl.)
- 7 cups (1505g) medium consistency buttercream frosting, I used three different colors for the flowers plus green for the leaves. I left some white to use to stick the bunny butts on.
- 12 Raffaello candies
- 4 oz (113g) white fondant
- 1.5 oz (43g) pink fondant
- 6 mini marshmallows
- 1 bottle red or pink gel food color, for tinting the white fondant pink (You will need additional gel food colors for tinting your buttercream the colors you choose.)
- 2 tbsp vegetable shortening, for greasing your mat
For the bunny feet
- Grease a Silpat or fondant mat with vegetable shortening.
- Roll out white fondant to about 1/4 inch thick.
- Grease the top of the white fondant and the bottom of the small teardrop cutter. Using the teardrop cutter, cut out 24 teardrop shapes.
- Using the wide end of the teardrop cutter, cut the pointy end of the teardrop off of each fondant shape to make a bunny foot.
- Grease the Silpat or fondant mat with more shortening.
- Roll out the fondant to about 1/4 inch thick.
- Grease the top of the pink fondant and the tip of a size 12 piping tip. Make 24 pink circles.
- Lightly press down on each circle to elongate it a little bit.
- Gently squeeze the sides of each circle to make a small oval for the paw prints.
- Roll out the pink fondant again. Grease the fondant and a size 5 piping tip. With the tip, make 72 circles. I made 12 at a time, letting them build up inside of the piping tip. I used the tip of a paint brush to push them out of the tip if they got stuck.Now you have all the parts to make your bunny feet.
- Using a small paint brush, add a small amount of water to the middle of one of the white bunny paws.
- With a small spatula, move one of the larger pink bunny pads onto the middle of the bunny paw where you added the water. Repeat with all of the bunny paws.
- Using the end of the small paint brush, lighly press three small holes into the bottom of the bunny paw.
- Add a small amount of water to each hole with the paint brush.
- Using the small spatula, add a small circle to each hole and press down lightly with your finger until you have three small paw prints. Repeat with each bunny paw.
For the buttercream flowers
- Get your Russian piping tips and and piping bags together. Russian piping tips do not have numbers on them so I took a photo so you can see which ones I am using. I used 16-inch piping bags for these tips.
- Drop the tip into the piping bag and push to the bottom of the bag.
- Using a pair of scissors, score a mark about halfway up the piping tip.
- Pull the tip out a little and cut on the line you made. Push the tip in so it fits snuggly into the bag.
- Fold the bag over your hand and fill with buttercream. Twist tightly and and secure with a piping bag tie if you have one. Repeat with other bags.
- Lightly frost a cupcake with an offset spatula. You want a small amount of frosting so that the flowers will stick.
- With one of the bags fitted with a Russian piping tip, hold the tip over the cupcake so it isn’t touching the cupcake and start squeezing the bag.
- Start squeezing the bag until the buttercream starts to reach the cupcake. Continue squeezing while pulling the bag up at the same time until you get the height of flower you want. Stop squeezing and pull the bag away.(You may have to practice a little bit to get the feel and the motion of making the flower. You can scrape the buttercream off of the cupcake and start over if you need to.)
- Pipe buttercream flowers around the cupcake in different colors until you’re happy with the way your cupcake looks. Repeat with the rest of your cupcakes. Now you’re ready to add your bunny butts.I actually made 24 cupcakes. I made 12 with bunny butts and 12 with just a buttercream swirl.
For the bunny butts
- Prepare two 12-inch piping bags as before using couplers. You will have one bag with white buttercream for sticking on the bunny butt and making a fuzzy tail and one bag with green buttercream for leaves.On the bag with the white buttercream, you’re going to start with tip #3. You will change to tip #233 when it’s time to make the fuzzy tail.
- Using the bag with the white buttercream fitted with tip #3, pipe a large dot in the middle of your cupcake where you want your bunny butt to lay.
- Open up your Raffaello candy and place it onto the cupcake.
- Take one of the bunny paws and add a dot of white buttercream onto the back of it.
- Lightly press the paw onto one side of the Rafaello candy. Repeat with the other paw.
- Add the candies and the paws onto the rest of the cupcakes.
- Use your green buttercream and tip #352 to add leaves between the flowers and around the cupcakes.
- Cut 6 mini marshmallows in half with kitchen scissors.
- Add a dot of white buttercream onto the back of the marshmallow and stick on top of the Raffaello candy for a tail. Repeat for all 12 cupcakes.
- Change the tip on your white buttercream bag to tip #233.
- Hold the tip close to the mini marshmallow and start squeezing, building up the furry tail. As you’re squeezing, pull up a little. Stop squeezing and pull the tip away. Do that all around the marshmallow. Do each bunny tail.
- If you're making an additional 12 cupcakes, decorate them with a 1M piping tip to make a buttercream swirl.
- Enjoy!
 | thewendthousekitchen.com")
I had so much fun making these bunny cupcakes for Easter. The little bunny butts buried in the buttercream flowers are so sweet. There definitely are some steps, but if you make your cupcakes and buttercream one day and then decorate the next, it makes it a little easier.
I hope you try these cupcakes and love them as much as we did! For more decorating ideas, visit my cake and cookie decorating page.
Sweet regards,
Michele